Posts

Showing posts from March, 2017

Forever in my heart

Image
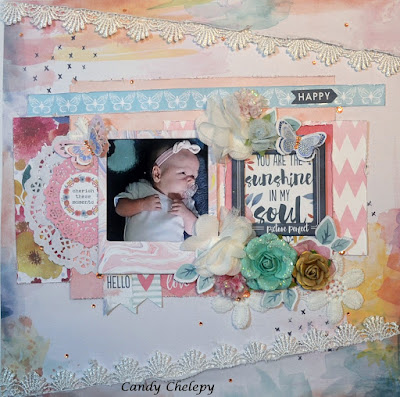
Welcome to another day month of the year. I can't believe it is the end of March already. I had the opportunity to give the moodboard for Creative Inspirations You had the choice of mood boards and you had to use one of the themes spring, flowers, family, friends, kids or celebrations The papers and emphemera were from the Kitaholics kit Here is the moodboard Products used White cardstock Cocoa Vanilla - Wild at heart collection - Lucious, mariposa, patchwork, fussycuts papers - chipboard frames - die cut emphemera White and pink paper doily Flowers and lace from my stash Shimmerz paints - coloringz Valentine spray fan brush Thank you for visiting xxx Candy

Happy

Image
Welcome everyone Today I have created a layout for you all using the Kitaholics March Kit. Always having beautiful papers and embellishments in these kits and you can't kill them. I still have some left from last month and I have made heaps with it. And here is the sketch from  Kitaholics Products used from the kit Cocoa Vanilla wild at heart collection - Luciuos and Artisian papers - Die cut emphemera - Chipboard frome White and pink paper doily Kaisercraft orange rhinestones Other products used Prima flowers The Vintage Chicks Club   laces and lace flowers Thank you for visiting xxx Candy

The Vintage Chicks Club

Image
Jumping for joy at the moment my dream of becoming  a Design Team member and tutor for these lovely ladies has finally come to life The Vintage Chicks Club Check out their store they sell the most beautiful laces. I am in love....               Introducing  Candy Chelepy  our Craft and Scrapbooking Designer from Rockhampton..                                                      Welcome Beautiful Lady..💖                                            <3 http://thevintagechicksclub.com.au/gallery                                    

Just For You

Image
Hello everyone to another monthly Design Team creation for  Just Add Flair Today I have made three cards with matching gift bags. It is very hard to find nice male papers but I recently visited a local craft show and found some. I have made two male cards and matching gift bags  and as well I challenged myself to make a female card. And this is what I came up with Female card and gift bag Male cards and gift bags Just Add Flair buttons Donna Flair Button Other Products used 4 x 8 1/4 inch card Assorted male paper collection Black twine Black, white, pink and gold web ribbons Assorted flowers from my stash Metal embellishments Thank you for visiting Candy Chelepy Just Add Flair DT

Three quick cards

Image
Welcome to another tutorial for Just Add Flair Today I am making three quick and easy cards using my scrap box again... Very simple and easy, but pretty All card bases measure 4x6 inches Hello Cut your pattern paper at 3 3/4 x 5 3/4 inches and tape onto your card base. Cut another piece of pattern paper at 2 1/2 x 5 3/4 inches but before you tape this down glue a piece of pretty ribbon over the top and underneath to hold it. Now tape this to the card base using foam tape. Then add all your embellies as well as the flair button in the middle of the flower. Truely blessed The card base is 4x6 inches  Cut your pattern paper at 3 3/4 x 5 3/4 inches and tape to the card base. I have used a white paper doily and pleated in the middle going round and round in the centre to make it frilly. Then glue to the middle of the flower and then adhere to the card base. Add your flair button to the centre of the flower and also some cut out flowers, heart sequ

Hello

Image
Creative Inspirations sketchathon March 3rd sketch my card Thank you for visiting Candy Chelepy

Truly Blessed

Image
Creative Inspirations sketchathon March 5th  sketch my card Thank you for visiting Candy Chelepy

Be Yourself

Image
Creative Inspirations sketchathon March 4th sketch my card Thank you for visiting Candy Chelepy

Love and adore

Image
Creative Inspirtions sketchathon March 2nd sketch my card Thank you for visiting Candy Chelepy

You're my sweetheart

Image
As you all  know I have a little to much stash,  and my new room is still not big enough.  So I decided I had better use it up.  So why not make some cards. I found some lovely card sketches on the Creative Inspirations March 1st sketch here is my card Thank you for visiting Candy Chelepy

Perfect Happiness

Image
Welcome welcome to another day of crafting and creating. Today I have made this tag for my  Just Add Flair tutorial for this month. I have this mighty scrap box that is over flowing with scraps and more scraps. So I on a mission to use some. I am getting there.... My tag measures about 3 1/8 x 6 3/8 inches I think it is about a size 8 tag. My papers and collectables come from the  Kaisercraft PS I love you collection I have just torn pieces and glued them onto the front of the tag,  distressed edges where it was needed. Some are raised with foam tape and other are flat. I then glued on the flowers, clock, butterflies, hearts and words all from the collectable pack. I added a flair button right in the middle of the paper heart and also had some coloured pink gauze in my stash and poked it in here and there to add some contrast. I used a stapler to adhere the gauze to the top of the tag. Just Add Flair products Lux flair button Ot

XOXO

Image
Welcome again to another month this tutorial is for  Off the Rails My layout today is made from a kit I bought from Kitaholics. And yes the photo is off my grand daughter Zarna Rose. The heart was printed on the pattern paper. So I cut it out carefully with a craft knife. I used a needle and carefully poked some holes around the heart design,  Then hand sewed around the heart with the twine. I also added some thin gold washi tape.  I cut a piece of cardstock and taped it to the back of the background piece to fill the heart hole shape. Using foam tape, tape the heart to the background.  I have added flowers, papers and embellies to the layout and also went around using my  finger with gold paint and then added some black ink to the edges as well. Products used White cardstock Simple Stories Love and Adore collection papers Pink and white twine Thin gold washi tape Black ink pad White doily Chipboard frame Kaisercraft

Mixed media tag

Image
Welcome everyone.  My turn again for the  Memory Maze  design team project. I have created a tag for this month it measures 3 1/8 x 6 3/8 inches. I am trying very hard to use up my scraps I have used the  Kaisercraft Coastal Escape collection. I cut the bottom paper at 6x3 inches then another piece at 5 3/4 x 2 inches. Glue these to the front of the tag, oh firstly go around the edges with  an edge distresser. I also added a shell tag under the top paper. I used a mask from Memory Maze and some light texture paste and applied this to the top of my tag. I then went and pulled out the circle piece with the mermaid on it and the shells,  starfish and the seaweed. I covered all these with some white paint, anything will do I just added it so the colour will stand out more. I used some Tim Holtz distress crayons, on the mermaid I added some black marks to make scales and hair. I also added some of the colours around and splashed them onto the tag. In th