Posts

Showing posts from 2018

Just for you

Image
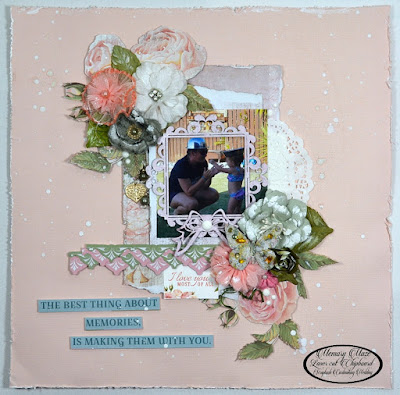
Hi everyone I am back from a little break and ready to ctreate again. Today I have made a lovely little girls card. Using a fancy scroll and a word phrase. I have started with a 5 1/4 x 5 1/4 inch card base. I cut the first pattern paper layer at 51/4x51/4 inches. The second is cut from white glitter paper  and it is cut at 5 x 5 inches. The third is using another pattern paper and cut that one at  4 3/4 x 4 3/4 inches Distress around the edges of all three then tape the first two onto the card base. The third pattern paper curl the right top corner use a little glue to hold this in place. Then tape onto the card using foam tape. I have matted my photo and put foam tape underneath to raise it up. Now for the corner swirl and the word phrase all I did was give them a couple of coats of white ink.  When dry glue onto your card. Add a little piece of lace under the corner roll and then add some flowers to finish off. Mmeory Maze product

Happy 30th Birthday card

Image
Hi everyone Candy here bringing you another 6x6 inch easel card using Memory Maze chipboard  I have left most of the chipboard pieces in there natural state. To tie in with the colour scheme of this card. The Happy birthday word piece  I inked with the green chalk ink and the 30 I used the red ink. Cover both pieces with some dimensional magic  to give a little dimension and to stand out more. Memory Maze products Vintage sign post Wire butterflies Script letters Vintage corner flourish Happy Birthday Other products 6x6 inch cream easel card base Assorted Prima papers Ecru cotton lace Green braid Olive vine and brick wall Prima chalk inks Dimensional magic Rhinestones Thank you for visiting Candy Chelepy 2018 Design Team

Happy Birthday Card

Image
Hi everyone my turn again to showcase some chipboard from  Memory Maze. I decide to make another card. This is for an order so I thought I would kill two birds with one stone So the saying goes. I made a 6 x 6 inch easel card. This one is for a 2 year old boy. Who loves machinery. I found the front End loader and thought yes that was ideal. I firstly painted the loader with white paint. You can use gesso or paint for this. I had some sharpie pens on  my desk I used the yellow for the body and black for the tyres. I then gave the tyres only a coat of dimensional magic. While this was drying I found a happy Birthday word and inked it with some black ink. You may have to give a couple of coats to get a nice finish. I have also used an acrylic 2018 heart. Memory Maze Products Front end loader Happy Birthday Family Hearts Other products 6x6  inch white easel card base Bo Bunny assorted papers Sha

Congratulations card

Image
I am up on Off The Rails this month. Using this moodboard as my colour palette. \ Here is my 5 x 7 inch card  Products used White 5x7 inch card base Prima papers and frame Assorted flowers, laces and a butterfly from my stash.

Congratulations card with matching box

Image
Hi everyone Today I have created a decorated card and matchng box. I have used for the card base a 5x7 inch white card. And for the box a 6x8x3/4 inch box which I purchased from Office works. For the card I cut two pieces of pattern paper. One measuring 5x7 inches and the other 4 7/8 x 6 7/8 inches distress around both of these pieces. Tear a V in the top one just to add  a bit of texture. Tapr these to the card base and curl some of the edges to give a distressed look. With the vintage frame and the two vintage corner flourishes paint with either gesso or white paint. While this is wet spray some coffee spray and daub with a paper towel to take off some of the colour. I then added some fine clear glitter  to give a little bling. When this was dry daub some silver ink here and there over the three pieces. Then give them a coat of dimensional magic/ Let this dry. I placed the square frame to the left of the card added the two flouri

Using up your scraps of chipboard

Image
Hello and welcome Today I have created four tags using some chipboard. I seem to have a lot of scrap pieces of chipboard left over from different projects. So I have decided to use some up. I have created four tags measuring 2 1/2 x 3 3/4 inches. Cover each of them with some pattern papers front and back. Then add whatever you have in your scrap box. I have used paper doilys, flowers, leaves, lace and assorted embellishments. One has a calendar on it and another a small note book. You could put a magnet on the back and put on the front of your fridge for a keepsake. Memory Maze Product A4 chipboard Thank you for visiting Candy Chelepy 2018 Design Team

A little bit shabby

Image
Hi everyone welcome, welcome, welcome... Today I have used the colours of the mood board as my inspiration and theme for my card. The card base I have used measures 5 x7 inches. This is the mood board for this month Cut the background pattern paper to 4 7/8 x 6 7/8 inches using an edge distresser or your scissors, distress around the four edges. Crinkle up the top right side corner.  Then tape to your card base.  Don't tape to the edges just incase you want to add anything underneath. Curl up the edges here and there. I went through my stash and found some different laces and some wedding veil tuile. Nothing is really measured. I just layered the tuile then the laces on top of each other to give some shabby layers.  I fussy cut out 2 large and three smaller flowers.  You can always use pre-made ones if you like. I distressed around the edges of the flowers,  then cut the petals to the centres. Scrunch them up then straighten a li

8 x8 inch Album

Image
Handmade 8x8 Album Hi everyone Candy here sorry I have been awal for a while but been away on holidays then when I came home no computer. So hopefully all good now. So today I have created an 8 x 8 inch album using some  A4 chipboard as the cover. I used 2 pieces of the A4 chipboard and cut an 8 x8 inch square from both. using one of the left over pieces cut a piece at 4 x 8 inches this piece is for the spine. Lay 2 pieces of white 12 x 12 inch card stock beside each other and tape together. Using tape, tape around all edges and middles of your card stock and lay onto your white card stock. Centering the smaller one (spine) in the centre of the card stock. Laving about 1/8 inch between the pieces. This allows the book to bend. Mitter the corners of the card stock Use your bone folder to go around the edges of the book  and then gently bend your pieces to fold over the edges. Add some tape to these edges and tape down.  Cr

Happy Birthday card

Image
Welcome today I have made for you all a 5 x 5 inch card Using Kaisercraft Rose Avenue Collection  and a Butterfly, Happy Birthday and corner scrolls from Memory Maze. For the chipbaord pieces I painted them all with white gesso. Then used my embossing enamel to emboss them all. They look very striking I wanted them to look a but shabby. Memory Maze products Happy Birthday Butterfly Magic Vintage corner flourish Other Products used 5x5 inch white card base  Kaisercraft Rose Avenue Collection - scrap papers and sticker sheet White lace flowers and flowers from my stash White string pearls Versamark Stampendous shabby white embossing enamel White gesso Thank you for visiting Candy Chelepy 2018 design team Memory Maze

The best things about memories

Image
Hello paper crafters today I have created for you a layout using some chipbaord from  Memory Maze. The photo is my grand daughter Zarna and her crazy Aunty Tracy giggle giggle they are both wearing the dogs feed dishes on there heads. To alter the frame and the bow I just painted them white with some gesso. Then sprayed with some pink spray and daubed some of the colour off just to tone it down a bit making it a bit shabby chic. Memory Maze products Lots of bows Vintage frame square Other Products used Kaisercraft Ballet cardstock Scraps of Rose Avenue collection papers - Collectables and sticker sheet Prima flowers, leaves and butterfly White enamet dots White paper doily Whits ink and brush to flick the paint with White gesso Pink spray Thank you for visiting Candy Chelepy 2018 Design Team Memory Maze

Sweet Memories

Image
Hi everyone and welcome. My turn to bring you my layout using some wonderful Memory Maze products. The photo is my gorgeous grand daughter Zarna Rose I pulled the 2 wrought iron gate pieces from the chipboard pack and also the large ornate frame from its pack. I glued the wrought iron gate pieces to the sides of the ornate frame. Then mixed together some white gesso, or you can use white paint. And the magenta ink, just a little as we only want it light. Paint this over your frame and while it is still wet cover with some clear fine glitter. Put aside to dry. I tore the two papers wider one end and thinner the other. Taped them onto the white cardstock. I then rolled the edges of the papers to make a curl. Add all the frame, flowers amd emphoria then draw a line around the edge of the layout as well as your emphoria pieces. Memory Maze products Wrought iron gates Ornate frames and flourishes Other products used